CROCHET PATTERN: PRIDE SHAWL
- Jun 1
- 6 min read
Updated: Jun 4

PRIDE MONTH CROCHET GRANNY SHAWL PATTERN
SKILL LEVEL: BEGINNER
Hi gay! Looking for a free crochet pattern you can make and wear to pride? Want to support a small queer creator rather than getting your pride merch from huge, pink-washing corporations?
Well, this is probably the pattern for you!
This is a classic triangular granny shawl with a simple border, in the colours of the progress pride flag. It looks fabulous, works up quickly and is one of those great projects that doesn't take a lot of brain power; you can crochet away mindlessly in front of the tv, on the bus, in the pub - wherever!
Beginner crocheters: If you've just learned to crochet, this pattern should be suitable for a first project. It involves chain stitches, double crochet stitches, single crochet stitches and a magic circle, but nothing more frightening than that! The paid version of this pattern also includes plenty of photos to help you understand it, and both versions are written using long-form instructions.
You can see the full pattern below for free, but please do consider buying the ad-free version if you can spare £3. As a small business it really helps me out, and 10% of each purchase will be donated to LGBTQ organisations. The two groups that I am currently supporting are: Dandelion DIY, a Bristol-based harm reduction group for trans+ people self-medicating with HRT, and African Rainbow Family, a grassroots charity that campaigns for racial justice and the human rights of LGBTIQ+ refugees and people seeking asylum.
You can tag me on instagram @nickyebbage if you post any photos of your finished shawl - I'd love to see them!


MATERIALS
Crochet hook (any size)
Scissors
Tapestry needle
Stitch marker
You can use any size yarn and crochet hook for this pattern. If you would like your shawl to look as close to mine as possible, I used DK yarn and a 5mm crochet hook. My finished shawl measures 168cm across the shoulders, and 78cm down the back. Everyone crochets slightly differently to one another, so yours might not be exactly the same size.
I used Yarnsmiths Create for my shawl but it's an acrylic yarn, and I'd personally recommend using a different fibre if you can afford it. Cotton is my favourite alternative these days and it would be perfect for this project; it's lightweight and breathable - so perfect for pride parades in the sun and heat - and it's better for the environment than acrylic (which, if you're unaware, is made from plastic).
You will need yarn in all the colours of the progress pride flag, which I have included an image of below. If you’re using dk yarn and a 5mm hook like I did, a 50g ball of each colour should be more than enough.

TERMINOLOGY:
I am using US terminology for this pattern
ch: chain
ch-space: chain space (the space that is created in this pattern when a single chain is used)
cluster: refers to a set of three double crochets 'clustered' together (these will naturally form as the pattern works up)
dc: double crochet
sc: single crochet
sl-st: slip stitch
PATTERN
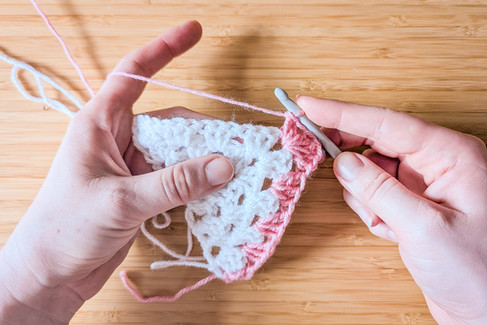
Using white yarn, start by making a magic circle.
ROW 1:
ch3, 3dc into the magic circle, ch1, 4dc into the magic circle.
You should end up with 2 clusters, plus an extra stitch either side (the initial ch3 you started with counts as one of these stitches).
Pull the magic circle tight.
Turn your work.
ROW 2:
ch3, 3dc in between the first and second dc of the previous row,
(3dc, ch1, 3dc) into ch-space between the clusters of the previous row,
4dc into the space between the last dc and ch3 from previous row.
Turn.
Your work should be starting to resemble a triangle.


For a detailed picture tutorial, you can purchase a PDF version of this pattern on Ravelry or Etsy for £3, which has step-by-step pictures to get you started!
ROW 3:
ch3, 3dc in between the first and second dc of the previous row,
3dc into the space between the clusters of the previous row,
(3dc, ch1 3dc) into ch-space at the tip of the triangle,
3dc into the space between the clusters of the previous row,
4dc into the space between the last dc and ch3 from previous row.
Turn.
ROW 4:
ch3, 3dc in between the first and second dc of the previous row,
3dc in the 2 spaces between the clusters of the previous row until you reach the space at the tip of the triangle,
(3dc, ch1 3dc) into ch-space at the tip of the triangle,
3dc in the 2 spaces between the clusters of the previous row,
4dc into the space between the last dc and ch3 from previous row, changing to pink yarn on last dc. (The PDF version of this pattern includes instructions for how to change colour.)
Turn.


ROW 5:
ch3, 3dc in between the first and second dc of the previous row,
3dc into all spaces between the clusters of the previous row until you reach the space at the tip of the triangle,
(3dc, ch1 3dc) into ch-space at the tip of the triangle,
3dc into all the spaces between the clusters of the previous row,
4dc into the space between the last dc and ch3 from previous row.
Turn.
REPEAT ROW 5:
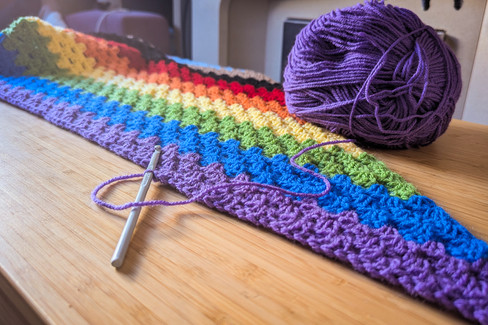
Row 5 now provides the basic pattern for the rest of the shawl. Repeat this from rows 5-44, changing yarns at the end of every fourth row (i.e. row 8, row 12, row 16, etc) and steadily working your way through the colours of of the progress pride flag.
Your shawl will grow in length with each row. While the first few colours will work up quickly, you will find that each colour takes more time as you progress down the shawl!
At the end of row 44 (when you have completed four rows in every colour of the progress pride flag, ending on four rows in purple) change colour to white on the final dc, and continue with the rest of the pattern below.


CREATING THE BORDER
ROUND 1:
Note that we have now swapped from rows to rounds. This means that instead of working back and forth along the shawl, turning each time you reach the end, you will now be working all the way around the shawl in a continuous loop.
In white yarn, ch1 and sc along the top of the shawl. You will find there aren’t any distinct stitches for you to work into, because this edge is made up of chains and the sides of your dc stitches. Deciding where to put your hook can be tricky, and it’s not an exact science! I usually aim for 2 sc’s for every cluster/gap. The PDF version of this pattern includes pictures for reference. Don't worry too much about how many stitches you end up with; the main thing is that your stitches look even.
When you reach the corner, 3sc in corner stitch.
Sc along the the next side of the triangle. The dc’s from round 44 will have formed distinct stitches, so this should be easier than the top of the shawl.
3 sc in corner stitch
Sc along the final side of the triangle
3 sc in corner stitch, join to first stitch of round with a sl-st.
ROUNDS 2-3:
ch1, sc in same stitch (first stitch of round 1)
Add a stitch marker to the first stitch to mark the start of your round
sc all stitches, adding three sc in every corner
At the end of the round sl-st the last stitch to the first stitch.
If you would like a bigger border, you can add more rounds. I thought three looked nice!
FINISHING OFF:
To fasten off, ch1, cut the yarn leaving a 15cm tail and pull the end through your chain.
Weave in all your ends: thread one of the ends through your tapestry needle and pull it through a nearby stitch. Pull it through several more nearby stitches.
The aim is to secure your crochet, while hiding the ends of the yarn inside your work.
Once it’s been woven through as many stitches as you like, stretch the work out a little, then cut the yarn close to the shawl. Make sure not to cut into the shawl itself!
Repeat for all ends.
Make sure you weave in all the ends on the same side of your work; this will create a right side (where the ends are completely invisible) and a wrong side (where the ends have been woven in).


Comments